Actually, it's the rest of the bulletin boards. I forgot to photograph the laptop lab.
Without further ado. . .
Same iPad. Same images as from second quarter. The font is from Word, printed and cut out, then pasted on to construction paper before being laminated. The DIGITAL FOOTPRINT is a collage of social networking site logos that I found online. I used it as fill for my letters.
The Cyberbullying poster on the left is from last year. The hand one's link is in the post below this one. The letters are hung up on twine, quite crookedly, I see. It's a font that I printed and cut out. I think it's called SQUARED or something. It was by far the fastest cut out job I've done on letters!
There it is! The rest of the story!
I shall do one more bulletin board in the hallway this year but I'm going to wait until next week, or maybe the week after. I have stuff going on and I'm tired of being creative. And I have a cold. Poor me!
Enjoy Easter!
Monday, April 7, 2014
Monday, March 31, 2014
Fourth Quarter Bulletin Boards
What's that they say about the best of intentions? I have lesson plans I meant to put up here and haven't. Like everyone else, I've been busy!
Here are some of my bulletin boards for fourth quarter. I have a few more that I'll photograph and put up in a few days.
**As always, you are welcome to use my work to make posters. I've put links to some of the posters below. Please don't sell my work. It's mine!
This poster is from last year. The surfer is Word clip art, enlarged.
The Cyberbullying posters were made in Word. You can find them here and here.
This one hangs in the laptop lab.
The Safe Internet Surfing one is in the hallway. This one was so fun!
Those little text boxes are different safe internet surfing tips like "Never give out your personal information online." I used a cheap tiki from the party store. The palm tree is made with green card stock that I cut out in a leaf shape and painted different green colors. The surfboard is made out of cardboard. The backdrop is pale blue fabric that I painted clouds on. I actually have grass painted underneath the water. The water is blue paper that I also painted. The sand is poster board that I spray painted with a textured spray paint. It looks like sand up close.
I will post the rest of the laptop lab posters later this week. Hopefully, I will get some lesson plans up!
Jennifer
Here are some of my bulletin boards for fourth quarter. I have a few more that I'll photograph and put up in a few days.
**As always, you are welcome to use my work to make posters. I've put links to some of the posters below. Please don't sell my work. It's mine!
This poster is from last year. The surfer is Word clip art, enlarged.
The Cyberbullying posters were made in Word. You can find them here and here.
This one hangs in the laptop lab.
The Safe Internet Surfing one is in the hallway. This one was so fun!
Those little text boxes are different safe internet surfing tips like "Never give out your personal information online." I used a cheap tiki from the party store. The palm tree is made with green card stock that I cut out in a leaf shape and painted different green colors. The surfboard is made out of cardboard. The backdrop is pale blue fabric that I painted clouds on. I actually have grass painted underneath the water. The water is blue paper that I also painted. The sand is poster board that I spray painted with a textured spray paint. It looks like sand up close.
I will post the rest of the laptop lab posters later this week. Hopefully, I will get some lesson plans up!
Jennifer
Thursday, January 9, 2014
Third Quarter Bulletin Boards, Continued
Last year I made a large, 3D keyboard out of take out boxes. I ended up redoing it this year because it didn't store well. I will have to figure out a better way to store it this year. I'm thinking I may need to cut the big keyboard in half and just hang it together next year. Thoughts?
Since I was cutting and gluing styrofoam boxes, I went ahead and made the whole keyboard this year. The "Your Fingers Have a Home" letters are the same ones I used last year.
This next bulletin board hangs in the hallway. I'll change it out mid February, maybe. I like it too much to give it the axe in three weeks!
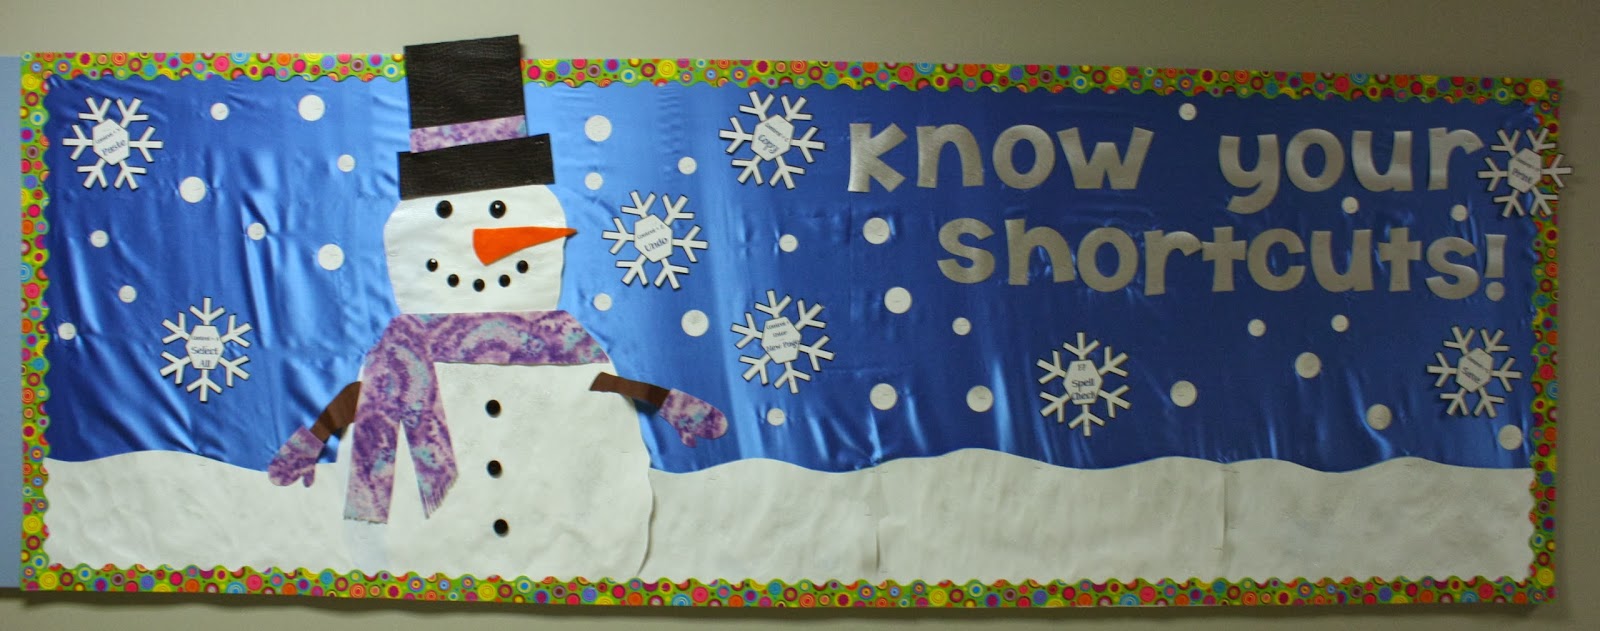
The snowflakes have Office shortcuts in there. If you're interested, let me know and I'll make a point to put the PDF of the snowflakes up. I printed them on regular white card stock and cut them out one night while I was watching an NCIS marathon. It made the job less painful!
The snowman is on poster board that I painted and sprinkled with glitter before cutting out. The paint is just some white paint squirted on the card stock and schmered around to give a bit of texture. I free handed the snowman. . . he's missing a waist. Whoops! The scarf and mittens are made out of felt. The hat is also felt. The eyes and buttons are those flat, plastic "crystals" and the nose is also felt. I found all this stuff in my craftyhole corner of the basement.
The letters are printed in reverse on silver scrapbook paper. I printed it on the back so that the ink wouldn't smear, which is why I printed it on the reverse. The backdrop is some very, very cheap clearance fake satin that was on clearance at WalMart for a buck a yard. I will probably not be able to reuse it because it snags and has holes from the staples. Cheap, very cheap! The little round snow blobs are white card stock I sent through the laminator. I sprinkled it with glitter before sending it and then punched out two sizes of circles from the paper.
Close up, this looks pretty awesome. I'm not sure how well it will hold up over the month and a half I'm hoping to get out of it. I'll let you know!
Welcome back to school!!!
Since I was cutting and gluing styrofoam boxes, I went ahead and made the whole keyboard this year. The "Your Fingers Have a Home" letters are the same ones I used last year.
This next bulletin board hangs in the hallway. I'll change it out mid February, maybe. I like it too much to give it the axe in three weeks!
The snowflakes have Office shortcuts in there. If you're interested, let me know and I'll make a point to put the PDF of the snowflakes up. I printed them on regular white card stock and cut them out one night while I was watching an NCIS marathon. It made the job less painful!
The snowman is on poster board that I painted and sprinkled with glitter before cutting out. The paint is just some white paint squirted on the card stock and schmered around to give a bit of texture. I free handed the snowman. . . he's missing a waist. Whoops! The scarf and mittens are made out of felt. The hat is also felt. The eyes and buttons are those flat, plastic "crystals" and the nose is also felt. I found all this stuff in my crafty
The letters are printed in reverse on silver scrapbook paper. I printed it on the back so that the ink wouldn't smear, which is why I printed it on the reverse. The backdrop is some very, very cheap clearance fake satin that was on clearance at WalMart for a buck a yard. I will probably not be able to reuse it because it snags and has holes from the staples. Cheap, very cheap! The little round snow blobs are white card stock I sent through the laminator. I sprinkled it with glitter before sending it and then punched out two sizes of circles from the paper.
Close up, this looks pretty awesome. I'm not sure how well it will hold up over the month and a half I'm hoping to get out of it. I'll let you know!
Welcome back to school!!!
Sunday, December 22, 2013
Third Quarter Bulletin Boards
Here are some of my third quarter bulletin boards:
I made this poster on Word and had it enlarged to 24x36. I will post a PDF as soon as school starts up after the New Year. It's saved on my work computer :)
I made this one because I noticed kiddos having problems remembering which program was which. Here's the PDF of these posters. They are enlarged to 18x24.
The "i statements" are borrowed from somewhere on the net. I reused the apps from my first quarter iPod. You can find the PDF to those under that post.
This one is from last year. I made new letters because I hated the old ones and put this in the laptop lab.
I have a few other bulletin boards that haven't finished or haven't photographed. I will update when I get those finished!
Have a fun and fantastic Holiday Break!
I made this poster on Word and had it enlarged to 24x36. I will post a PDF as soon as school starts up after the New Year. It's saved on my work computer :)
I made this one because I noticed kiddos having problems remembering which program was which. Here's the PDF of these posters. They are enlarged to 18x24.
The "i statements" are borrowed from somewhere on the net. I reused the apps from my first quarter iPod. You can find the PDF to those under that post.
This one is from last year. I made new letters because I hated the old ones and put this in the laptop lab.
I have a few other bulletin boards that haven't finished or haven't photographed. I will update when I get those finished!
Have a fun and fantastic Holiday Break!
Saturday, November 16, 2013
Updated Type to Learn Bulletin Board
Here is the updated photo with ALL the leaves to date.
It's a bit crowded. The kids are farther along than I had thought, which is great, but WHOA there are a ton of leaves! You can see I ended up taking off the super cute, matchy-matchy border and adding leaves around the edges. I filled out the tree and have made piles.
Fortunately, we have one full week of typing left to add to the tree. I will probably make the piles bigger. There is some space on one side of the bulletin board that I may take and pound up the leaves. Right now it's messy looking and I prefer things to be neat, visually. (Don't look in my closets. Behind closed doors. . . I'm a pig.)
I am very, very glad the kids are enjoying this project. Even on the days I have the games turned on, most are opting to do the lesson and final challenge so they can put up another leaf.
It's a bit crowded. The kids are farther along than I had thought, which is great, but WHOA there are a ton of leaves! You can see I ended up taking off the super cute, matchy-matchy border and adding leaves around the edges. I filled out the tree and have made piles.
Fortunately, we have one full week of typing left to add to the tree. I will probably make the piles bigger. There is some space on one side of the bulletin board that I may take and pound up the leaves. Right now it's messy looking and I prefer things to be neat, visually. (Don't look in my closets. Behind closed doors. . . I'm a pig.)
I am very, very glad the kids are enjoying this project. Even on the days I have the games turned on, most are opting to do the lesson and final challenge so they can put up another leaf.
Friday, November 8, 2013
Ongoing Tree Leaf Typing Bulletin Board
I changed out the bulletin board in the hall. It measures five yards long. . . that's fifteen feet of board I need to decorate!
The background is green fabric and the border is from my hoard.
The trunk was cut out from the butcher paper. I used some acrylic paint and schmered it around to create some texture. The trunk was free-handed. I have no artistic ability, trust me! I grabbed a pair of scissors and cut. The leaves hide most of it so it isn't a big deal that it's not perfect.
I cut out round shapes of different fall colors to put on the tree so it didn't look weird as I was filling it. Turns out I didn't really need those! You can see them peeking through at the top. It also helps add color so that you don't see the background in places I didn't get the leaves close enough together.
The leaves are die cut out of the school's construction paper.
We use the program TYPE TO LEARN at our school. Every time the students complete a Final Challenge and move on to the next level, they write their name on a leaf and it is stapled to the board. I am surprised at how many leaves I have. . . I haven't had half of the students do leaves yet. I would bet that I get as many, if not more, next week. I may have to make piles of leaves!
Since this is an ongoing project, I wrote a blurb and stapled it to the bulletin board explaining this.
This bulletin board will stay up for a month. I will pull it down right before the Holiday break in December. I will probably recruit some students to help pull down the hundreds of leaves!!
This is really a huge bulletin board so I needed something big for the wall. This works nicely!
The background is green fabric and the border is from my hoard.
The trunk was cut out from the butcher paper. I used some acrylic paint and schmered it around to create some texture. The trunk was free-handed. I have no artistic ability, trust me! I grabbed a pair of scissors and cut. The leaves hide most of it so it isn't a big deal that it's not perfect.
I cut out round shapes of different fall colors to put on the tree so it didn't look weird as I was filling it. Turns out I didn't really need those! You can see them peeking through at the top. It also helps add color so that you don't see the background in places I didn't get the leaves close enough together.
The leaves are die cut out of the school's construction paper.
We use the program TYPE TO LEARN at our school. Every time the students complete a Final Challenge and move on to the next level, they write their name on a leaf and it is stapled to the board. I am surprised at how many leaves I have. . . I haven't had half of the students do leaves yet. I would bet that I get as many, if not more, next week. I may have to make piles of leaves!
Since this is an ongoing project, I wrote a blurb and stapled it to the bulletin board explaining this.
This bulletin board will stay up for a month. I will pull it down right before the Holiday break in December. I will probably recruit some students to help pull down the hundreds of leaves!!
This is really a huge bulletin board so I needed something big for the wall. This works nicely!
Saturday, November 2, 2013
Proud To Be An American Letters
I have been given the daunting task to make a backdrop for our school's Veterans Day assembly. This is one of the many reasons I love our school. Our principal is uber patriotic and every year he invites the students' Veteran family members to come to an assembly and be honored. It is always a rousing success and every year he does something a little different so the assembly doesn't get boring.
This year there will be a reception prior to the assembly. My job is to make a backdrop for a wall. This doesn't sound too hard. . . except the Vets will be having a group photo taken in front of the wall - by me. This means 1) the wall will be immortalized and 2) I better brush up on my photography skills. The whole thing makes me nervous.
I will deal with #2 by taking at least fifty photographs, adjusting settings (the pre-set ones. . . I am pretty sure I will ruin the camera if I get creative), and praying. Hard. I may attend a weekday service in addition to Sunday Mass just to make sure my bases are covered.
Number one is still in the works. I had a vision of some simple stars and strips with "Proud to be an American" across the top. I decided to do the letters yesterday and they came out well. Actually, they came out too good. My simple stars and stripes will look really bad next to them.
You get the idea.
These were a pain in the butt to figure out how to make. I spent too much time in Word 2010 KNOWING that I could do it there. I couldn't.
Here's how to fill your letters with a picture or clip art. There is probably a better way. I don't know it. This is how I did it. If you know a better way, more power to ya.
Open up a PowerPoint Slideshow.
Click on the Design Tab (RED), Then Page Set up (BLUE) and adjust your slide size to the page size you will be using. My letters were HUGE so I changed mine to 11x17.
Next step: Add Word Art.
Insert Tab (Red), Word Art (Blue) and pick the first option (Green).
I like to type my letters, then highlight them but you can change this setting before you type. Either way works.
Highlight your letter (if you are doing that. . . Red arrow)
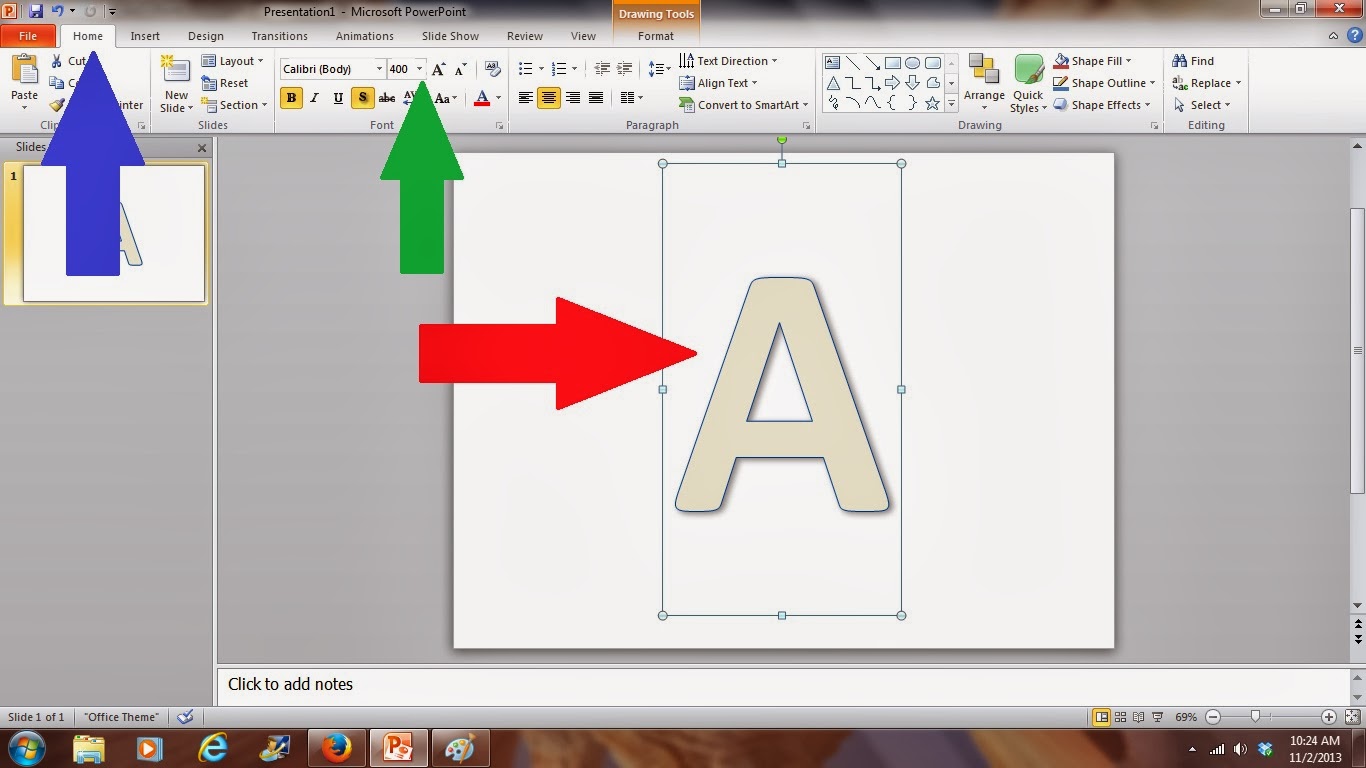
Click on Home Tab (Blue)
Adjust your font and size (Green)
Now go to the design tab (red)
Text Fill (Blue)
Texture (green)
More Textures (Purple)
Click Picture or Texture Fill (Red)
Clip Art (Blue)
Insert what you are looking for and click GO (Green)
Choose your option, click OK.
There you have it! You can adjust your outline while you are in the previous menu (before clicking OK, click TEXT OUTLINE and OUTLINE STYLE).
To be able to print them, I saved them as individual jpegs. Photos tend to print out nicer and, truth be told, it was easier for me. That's why I did it.
Click the FILE tab. Choose SAVE AS. Click SAVE AS TYPE (RED ARROW).
Choose the JPEG File Interchange Format. It will ask you questions like "For current slide or all slides". Pick what you need. I usually do all slides. . . it saves all individual slides as individual pictures.
Print out as a photo. I sent mine to the UPS store and paid fifty cents apiece to have them printed out. I laminated them on the school's laminating machine and cut them out. The result: Letters that are WAY too nice for what I had intended on doing. Unfortunately, this means I have to take it up a notch or two!
Update: I showed my husband my letters and he said that I should put the flags of the five different armed forces on the wall. I found them online for $6 apiece and bought all five. It was PERFECT! My husband is ex-Air Force so we always fly the American Flag at our house. We now own the Armed Forces flags to put up on Memorial Day, Flag Day, D Day, Pearl Harbor Day and Veterans Day. I'm sure there are a few others and I'm sure we will be proudly displaying our flags on those days, too!
This year there will be a reception prior to the assembly. My job is to make a backdrop for a wall. This doesn't sound too hard. . . except the Vets will be having a group photo taken in front of the wall - by me. This means 1) the wall will be immortalized and 2) I better brush up on my photography skills. The whole thing makes me nervous.
I will deal with #2 by taking at least fifty photographs, adjusting settings (the pre-set ones. . . I am pretty sure I will ruin the camera if I get creative), and praying. Hard. I may attend a weekday service in addition to Sunday Mass just to make sure my bases are covered.
Number one is still in the works. I had a vision of some simple stars and strips with "Proud to be an American" across the top. I decided to do the letters yesterday and they came out well. Actually, they came out too good. My simple stars and stripes will look really bad next to them.
You get the idea.
These were a pain in the butt to figure out how to make. I spent too much time in Word 2010 KNOWING that I could do it there. I couldn't.
Here's how to fill your letters with a picture or clip art. There is probably a better way. I don't know it. This is how I did it. If you know a better way, more power to ya.
Open up a PowerPoint Slideshow.
Click on the Design Tab (RED), Then Page Set up (BLUE) and adjust your slide size to the page size you will be using. My letters were HUGE so I changed mine to 11x17.
Next step: Add Word Art.
Insert Tab (Red), Word Art (Blue) and pick the first option (Green).
I like to type my letters, then highlight them but you can change this setting before you type. Either way works.
Highlight your letter (if you are doing that. . . Red arrow)
Click on Home Tab (Blue)
Adjust your font and size (Green)
Now go to the design tab (red)
Text Fill (Blue)
Texture (green)
More Textures (Purple)
Click Picture or Texture Fill (Red)
Clip Art (Blue)
Insert what you are looking for and click GO (Green)
Choose your option, click OK.
There you have it! You can adjust your outline while you are in the previous menu (before clicking OK, click TEXT OUTLINE and OUTLINE STYLE).
To be able to print them, I saved them as individual jpegs. Photos tend to print out nicer and, truth be told, it was easier for me. That's why I did it.
Click the FILE tab. Choose SAVE AS. Click SAVE AS TYPE (RED ARROW).
Choose the JPEG File Interchange Format. It will ask you questions like "For current slide or all slides". Pick what you need. I usually do all slides. . . it saves all individual slides as individual pictures.
Print out as a photo. I sent mine to the UPS store and paid fifty cents apiece to have them printed out. I laminated them on the school's laminating machine and cut them out. The result: Letters that are WAY too nice for what I had intended on doing. Unfortunately, this means I have to take it up a notch or two!
Update: I showed my husband my letters and he said that I should put the flags of the five different armed forces on the wall. I found them online for $6 apiece and bought all five. It was PERFECT! My husband is ex-Air Force so we always fly the American Flag at our house. We now own the Armed Forces flags to put up on Memorial Day, Flag Day, D Day, Pearl Harbor Day and Veterans Day. I'm sure there are a few others and I'm sure we will be proudly displaying our flags on those days, too!
Subscribe to:
Posts (Atom)